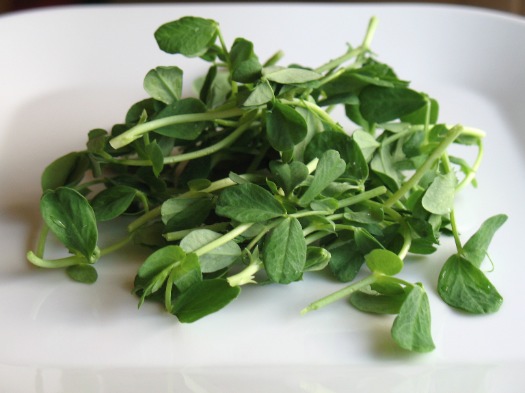
Here's a little surprise we got in our Washington's Green Grocers box last week: Pea Shoots!
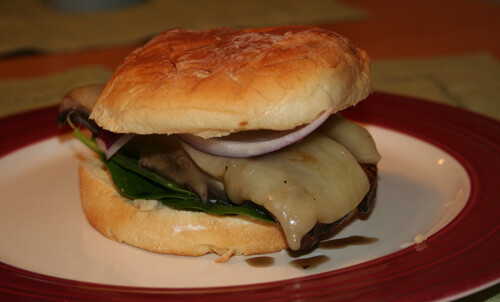
They sort of look like sprouts so we put them on our favorite portabello mushroom burger in lieu of lettuce and it was great! It's probably closer to a spinach substitute than a lettuce/spouts substitute because of its stronger flavor and texture, but what a great little green! I think it will be great mixed into salads, tossed in pasta, and substituted in for lettuce/sprouts (like in our yummy chicken salad sandwich!)
So if you see these little babies at the farmer's market or supermarket, it's definitely worth a try.
Wednesday, March 30, 2011
Tuesday, March 29, 2011
Pride and Prejudice
I'm not sure how I got through high school and college without reading Pride and Prejudice... but somehow it slipped through the literary cracks. Fortunately, this was the perfect book to take my mind off studying before bed and the short chapters were easy for me to pick up and put down.
But even if you're not studying, Pride and Prejudice is still one of those must-read books.
I have yet to meet a woman who has not fallen in love with the 2005 movie starting Keira Knightly and my love for the movie definitely encouraged me to read the book.
It's a quick read but you have to get used to the old-fashioned writing style of the time and the English spellings. But that's easy to get past and you are guaranteed to be whisked away into the romantic lives of the Bennett sisters. I think anyone with a sister can relate to the characters at least a little bit. They family dynamics and personalities are witty, sarcastic, entertaining, and timeless.
I also love comparing books to the movies... and there are definitely some significant differences. This is a fun summer read with the intrinsic value of reading a classic masterpiece. I'm giving it an 8 out of 10.
But even if you're not studying, Pride and Prejudice is still one of those must-read books.
I have yet to meet a woman who has not fallen in love with the 2005 movie starting Keira Knightly and my love for the movie definitely encouraged me to read the book.
It's a quick read but you have to get used to the old-fashioned writing style of the time and the English spellings. But that's easy to get past and you are guaranteed to be whisked away into the romantic lives of the Bennett sisters. I think anyone with a sister can relate to the characters at least a little bit. They family dynamics and personalities are witty, sarcastic, entertaining, and timeless.
I also love comparing books to the movies... and there are definitely some significant differences. This is a fun summer read with the intrinsic value of reading a classic masterpiece. I'm giving it an 8 out of 10.
Sunday, March 20, 2011
Our New Car!
We knew this day would come. It was time to retire Michael's beloved 1995 Nissan Maxima SE with 192,000+ miles. Yes, it was time.
We went into this car shopping business with our hearts set on a Subaru but after test driving the Subaru Outback, Subaru Forrester, Mitsubishi Outlander and Hyundai Santa Fe... the Santa Fe was the clear winner.
Look at all that room! This is Michael and my first non-sedan car and I still need to get used to driving the taller and wider car.
Now we did need to purchase the "Limited" model to get the sunroof so we ended up spending more than if we were to get a Subaru Forrester, but look at all the fancy gadgets we got! We love it. And of course, the sunroof...
Having car payments is not going to be fun but I definitely think it's worth it. Michael got everything he could out of his Maxima (we called it the "Ma_i_a" because the letters were falling off the back of the car) and even traded it in for a whoppin' $500!
Goodbye ol' gal. It was a good, long ride and we'll miss you...
We went into this car shopping business with our hearts set on a Subaru but after test driving the Subaru Outback, Subaru Forrester, Mitsubishi Outlander and Hyundai Santa Fe... the Santa Fe was the clear winner.
Look at all that room! This is Michael and my first non-sedan car and I still need to get used to driving the taller and wider car.
Now we did need to purchase the "Limited" model to get the sunroof so we ended up spending more than if we were to get a Subaru Forrester, but look at all the fancy gadgets we got! We love it. And of course, the sunroof...
Having car payments is not going to be fun but I definitely think it's worth it. Michael got everything he could out of his Maxima (we called it the "Ma_i_a" because the letters were falling off the back of the car) and even traded it in for a whoppin' $500!
Goodbye ol' gal. It was a good, long ride and we'll miss you...
Tuesday, March 15, 2011
Re-Post: Easiest Banana Bread Ever
This is a re-post of the easiest and best banana bread recipe from our old super-slow blog. My competitive dancer, piano recital performing, active sorority member, always volunteering cousin SOMEHOW finds time to also keep her grades up at UC San Diego AND bake for her friends during finals. I don't know how these kids do it these days!
So this recipe re-post is dedicated to my super woman cousin :)
INGREDIENTS (you probably have most in your kitchen already)
3 or 4 ripe bananas, smashed
1/3 cup melted butter
1 cup sugar (can easily reduce to 3/4 cup)
1 egg, beaten
1 teaspoon vanilla
1 teaspoon baking soda
Pinch of salt
1 1/2 cups of all-purpose flour (I like using our favorite Trader Joe’s Multigrain Baking & Pancake Mix)
2/3 cup dark chocolate chips (or more if you’re a chocoholic like Michael)
1/3 cup toasted, sliced almonds OR walnut pieces (optional)
DIRECTIONS (No Mixer Required!!)
1. Preheat the oven to 350°F (175°C) and put on your apron
2. With a fork, mash up the bananas in a big mixing bowl
3. Then melt butter in a cup in the microwave and mix into the mashed bananas
4. Now mix in the sugar, egg, and vanilla
5. Sprinkle the baking soda and salt over the mixture and mix in
6. Add the flour last and mix just until it’s all blended
7. Fold in chocolate chips, almonds, or walnuts
8. Pour mixture into a buttered 4x8 inch loaf pan and bake for 1 hour (or you could line muffin cups and poor mixture into 18 cups)
9. Bake until toothpick comes out clean (about 1 hour for loaf pan or 30 mins. for muffins)
10. Cool on rack for a while so it’s easier to flip out of the pan
11. Flip the bread out of the pan, slice, eat some while it’s still warm, bring some into work to share (or not), and never waste over-ripe bananas again!
So this recipe re-post is dedicated to my super woman cousin :)
INGREDIENTS (you probably have most in your kitchen already)
3 or 4 ripe bananas, smashed
1/3 cup melted butter
1 cup sugar (can easily reduce to 3/4 cup)
1 egg, beaten
1 teaspoon vanilla
1 teaspoon baking soda
Pinch of salt
1 1/2 cups of all-purpose flour (I like using our favorite Trader Joe’s Multigrain Baking & Pancake Mix)
2/3 cup dark chocolate chips (or more if you’re a chocoholic like Michael)
1/3 cup toasted, sliced almonds OR walnut pieces (optional)
DIRECTIONS (No Mixer Required!!)
1. Preheat the oven to 350°F (175°C) and put on your apron
2. With a fork, mash up the bananas in a big mixing bowl
3. Then melt butter in a cup in the microwave and mix into the mashed bananas
4. Now mix in the sugar, egg, and vanilla
5. Sprinkle the baking soda and salt over the mixture and mix in
6. Add the flour last and mix just until it’s all blended
7. Fold in chocolate chips, almonds, or walnuts
8. Pour mixture into a buttered 4x8 inch loaf pan and bake for 1 hour (or you could line muffin cups and poor mixture into 18 cups)
9. Bake until toothpick comes out clean (about 1 hour for loaf pan or 30 mins. for muffins)
10. Cool on rack for a while so it’s easier to flip out of the pan
11. Flip the bread out of the pan, slice, eat some while it’s still warm, bring some into work to share (or not), and never waste over-ripe bananas again!
Sunday, March 13, 2011
Moist Chocolate Cupcakes with Vanilla Buttercream
Out of the blue last week, I had a craving to find a great chocolate cupcake recipe... dense, moist, easy and delicious... and I think I found it. (And The Farm Chick's blog that I found it on will definitely make it on my RSS feed - it's cute!)
The only thing I may change is the frosting. The buttercream frosting was a little too sweet for me and Michael and I will probably make our favorite whipped cream cheese frosting instead next time. The actual cupcake recipe though... mmmm... perfect.
Moist Chocolate Cupcakes with Vanilla Buttercream
CUPCAKE INGREDIENTS
1 cup sugar
1 cup brown sugar (not packed)
1 3/4 cup flour
3/4 cup cocoa powder
1 1/2 tsp baking soda
1 1/2 tsp baking powder
1/2 tsp salt
2 eggs
1 cup milk
1/2 cup vegetable oil
2 tsp vanilla
1 cup boiling water
Preheat oven to 350 degrees. Fill muffin pans with 24 cupcake liners.
Sift dry ingredients into a mixing bowl. (If you're using a hand mixer, I recommend a batter bowl to easily pour the batter into the cupcake liners). Add eggs, milk, oil and vanilla. Beat with a mixer for about two minutes, occasionally scraping the sides of the bowl with a rubber spatula. Add the boiling water, and beat, just until blended. (Don't be alarmed - the batter appears watery). Evenly ladle (or pour) the batter into the liners.
Bake for 20-25 minutes, until the center of the cupcakes springs back when lightly touched. Cool and frost.
VANILLA BUTTERCREAM INGREDIENTS
1/3 cup butter, just slightly cooler than room temperature
3 1/2 cups powdered sugar
1/4 cup milk
1 1/2 tsp vanilla
Beat butter in a medium-sized mixing bowl until creamy. Gradually beat in 3 cups of the powdered sugar. Beat in milk and vanilla. Blend in remaining 1/2 cup powdered sugar.
Thursday, March 10, 2011
Southwestern Crockpot Chicken
This recipe is dedicated to our friends Simon and Claire -- new parents of beautiful baby Keira and working parents without a whole bunch of time to cook every night!
This recipe has been a staple in our home for the last couple years and it's so easy and versatile. The hardest part is getting up 10 minutes earlier in the morning to throw all this stuff in the crockpot before you head to work.
It's perfect wrapped up in a whole wheat tortilla with a little cheese sprinkled on top or mixed up in a bowl with some rice or on top of some polenta! Easy and delish!
INGREDIENTS
1 1/2 lbs. skinless, boneless chicken breasts
2 cloves of garlic, minced
1 yellow onion, chopped
15 oz. black beans, drained and rinsed
1 cup frozen or canned corn
12 oz. high quality salsa (we recommend Trader Joe's Double Roasted Salsa!)
2 fresh Serrano or jalapeno chiles, chopped
3 tbsp. cilantro, chopped
kosher salt, to taste
freshly ground pepper, to taste
shredded cheese, if you want
Place chicken breasts in bottom of crockpot. Add onion, garlic, black beans, corn and salsa. Stir until the mixture is evenly distributed in the pot. Set crockpot on low for 8 hours.
When you come home from work, open the lid and shred the chicken breasts by moving against the grain with a fork. Mix in chopped chilies and cilantro, season with salt and pepper, then close the lid and turn the crockpot on high for 30 minutes.
It makes a lot so it's also great for leftover lunch and/or dinner the next day too!
Saturday, March 5, 2011
Seared Tuna Steaks with Citrusy Soy Sauce & Crisp Sushi-Rice Cakes
Mirin is one of my favorite ingredients of all time! The sweet and savory sauce spooned over the fish is so delicious... I wanted to spoon it over my entire plate! Here are two more Food & Wine recipes to add to the rotation.
Seared Tuna Steaks with Citrusy Soy Sauce
1/2 cup soy sauce
1/4 cup mirin
1 small shallot, thinly sliced
1/2 jalapeño, seeded and chopped
2 tablespoons fresh orange juice
One 3-inch strip of lemon zest plus 1 tablespoon fresh lemon juice
1 teaspoon sugar
1/4 teaspoon ground coriander
1 tablespoon vegetable oil
Four 4-ounce tuna steaks, 1 inch thick
Salt and freshly ground pepper
In a small saucepan, combine the soy sauce, mirin, shallot, jalapeño, orange juice, lemon zest and juice, sugar and coriander. Simmer over moderate heat until reduced by half, about 8 minutes. Strain the sauce.
In a large nonstick skillet, heat the oil until shimmering. Season the tuna with salt and pepper. Cook over high heat for 1 minute per side. Transfer the tuna to a platter and let rest for 1 minute; thickly slice and serve with the sauce.
Crisp Sushi-Rice Cakes
1 cup sushi rice, rinsed
1 1/2 cups water
1/2 tablespoon mirin
1/2 teaspoon rice vinegar
1/2 teaspoon sugar
Salt
Vegetable oil, for frying
In a medium saucepan, combine the rice, water, mirin, vinegar and sugar and bring to a boil. Cover and cook over low heat for 20 minutes. Fluff the rice. Transfer to a bowl and let cool. Season with salt.
Preheat the oven to 325°. In a large nonstick skillet, heat 1/4 inch of oil until shimmering. For each cake, pack the rice into a 1/4 cup measuring cup; unmold and flatten slightly. Cook the cakes over moderately high heat, pressing, until golden brown, about 4 minutes. Turn and cook for 4 minutes longer. (Don't overcook... the cakes get too hard when over fried so scoop them out when they are light brown).
Serve hot.
Now spoon over the yummy sauce and serve it with a veggie. We had some steamed organic broccoli and it was the perfect compliment!
Thursday, March 3, 2011
Food Photography
I never thought I'd be one of those people. I mean, who remembers to take a picture of delicious food before you devour it?
So obviously Michael and I have gotten into a habit of taking photos of our favorite recipes and posting the recipes on this blog. Unfortunately, we have this very non-professional camera (shown above) and usually have terrible lighting because we don't get home until after dark and don't have natural light to take beautiful photos of our favorite foods!
We may have to upgrade our camera since I stumbled upon this blog post on thekitchn. We will also need to work on composition and lighting.
Thank you for putting up with our less-than-par photos. I'm definitely going to try and beef up the food photography on this little blog of ours. Yay for projects!
So obviously Michael and I have gotten into a habit of taking photos of our favorite recipes and posting the recipes on this blog. Unfortunately, we have this very non-professional camera (shown above) and usually have terrible lighting because we don't get home until after dark and don't have natural light to take beautiful photos of our favorite foods!
We may have to upgrade our camera since I stumbled upon this blog post on thekitchn. We will also need to work on composition and lighting.
Thank you for putting up with our less-than-par photos. I'm definitely going to try and beef up the food photography on this little blog of ours. Yay for projects!
Sunday, February 27, 2011
Simple Chicken Stock
So you're probably thinking "why would I make my own chicken stock when I can just go to the store and pick up a can?" Oh, you do not know what you're missing!
We got this recipe from the knife skills class at L'Academie de Cuisine in Bethesda that we took a couple years ago. It has changed our culinary lives. Not only do we debone all our own organic, free-range chickens (which is cheaper than buying chicken parts piecemeal), but we also use this delicious chicken stock in all our recipes. The flavor of the stock provides much more depth than the canned stuff... it automatically steps the food up a notch!
INGREDIENTS
4 pkgs chicken backs or 3 large pkgs chicken wings
(We use the carcasses of 3-4 chickens after we take off all the good stuff)
5 carrots, each cut into 4 pieces
3 stalks celery, each cut into 4 pieces
3 leeks, white par only, cut in half and rinse
3 onions, cut into large pieces
handful of black peppercorns
4 bay leaves
1/2 cup fresh parsley or parsley stems
1/4 cup dried thyme
1. Place all ingredients in large pot
2. Cover with cool water
3. Bring to a boil and immediately reduce heat to a simmer
4. Simmer at least 2 hours
5. Strain (see below)
6. Divide up into 1 cup containers and freeze until needed
Here are some pictures of our ghetto straining method just in case you don't have cheese cloth (or don't feel like buying any).
Then find a strainer with little holes to catch all the little herb bits.
Let cool and skim off fat before freezing. This makes a lot and lasts us a few months. Trust me, it's worth it.
Hello Again...
We're back! It's been a rough couple of weeks travelling across the country for daddy's birthday and cramming for my first CPA exam. I survived (barely) but I must admit that I don't know if I really want to be a CPA after all. Perhaps accounting is not my calling in life... hmmm...
But on a brighter note, Daddy's birthday weekend was fantastic! Good food, good wine, and so much fun with the family. It's times like these that I hate living 3,000 miles away. Here are a few photos.
Saturday, February 5, 2011
Coffee on a Cold Winter Morning
When the weather outside your window looks like this...
... it's nice to be inside with this...
My Christmas gift and new favorite mugs are handmade by Bianka Groves, a student at the Corcoran School of Art, who sells them at the boutique Michael finds my favorite earrings.
The best part is what goes inside the mugs... Asheville Coffee Roasters beans. We always come back from the Merschats with a few bags because we haven't found beans that "bloom" as well in our Chemex.
Now you may asking... what kind of snobs drink hand-dripped coffee? Is there REALLY a difference between the Chemex and my $100 grind and brew coffee maker...
All I can say is try it and you'll be a convert. Honestly, I was skeptical at first too but Mama Merschat got us one for Christmas a couple years ago... and now I'm pushing it onto you!
You can get a Chemex and its filters at World Market stores and you'll taste the difference. Flavorful and smooth coffee without the bitterness. Yeah, it's not as convenient as a coffee maker (we still use ours when we're rushed) but weekends are made for good coffee (and homemade biscuits!)
... it's nice to be inside with this...
My Christmas gift and new favorite mugs are handmade by Bianka Groves, a student at the Corcoran School of Art, who sells them at the boutique Michael finds my favorite earrings.
The best part is what goes inside the mugs... Asheville Coffee Roasters beans. We always come back from the Merschats with a few bags because we haven't found beans that "bloom" as well in our Chemex.
Now you may asking... what kind of snobs drink hand-dripped coffee? Is there REALLY a difference between the Chemex and my $100 grind and brew coffee maker...
All I can say is try it and you'll be a convert. Honestly, I was skeptical at first too but Mama Merschat got us one for Christmas a couple years ago... and now I'm pushing it onto you!
You can get a Chemex and its filters at World Market stores and you'll taste the difference. Flavorful and smooth coffee without the bitterness. Yeah, it's not as convenient as a coffee maker (we still use ours when we're rushed) but weekends are made for good coffee (and homemade biscuits!)
3 Ingredient Homemade Biscuits
Is there anything better than warm biscuits on Saturday morning? I dare say not much!
So here's my super simple, 5 minute prep, 10 minute bake recipe... you have no excuse not to have warm, delicious biscuits on a cold, winter morning.
(The one thing you will need is a biscuit cutter but they're cheap and will last you forever so go out and get one if you don't already have one... or a couple)
INGREDIENTS
2 cups Trader Joe's Multigrain Baking & Pancake Mix (and a little more for sprinkling on work surface)
2/3 cup milk
3 tbsp oil
Now just follow the instructions on the side of the Trader Joe's Multigrain Baking & Pancake Mix box! (I've added my supplemental directions in parentheses)
Pre-heat oven to 425 degrees.
Stir together all the ingredients until moistened (I use a fork). Turn dough out onto a floured board (I use my counter) and knead 8-10 times. Roll or pat out 1/2 inch thick and cut with biscuit cutter dipped in flour (I like using the small biscuit cutter but any size works). Place on ungreased baking sheet (and melt a couple tbsp of butter in a mug in the microwave and brush it onto the unbaked biscuits before they go into the oven). Bake for 8-10 minutes or until golden brown. (I also brush with some more butter when they're hot out of the oven... it's the simple pleasures in life, right?)
And that's it! Then top with local honey or homemade fig jam (or slather with gravy like they do it down South). Mmmmm...
So here's my super simple, 5 minute prep, 10 minute bake recipe... you have no excuse not to have warm, delicious biscuits on a cold, winter morning.
(The one thing you will need is a biscuit cutter but they're cheap and will last you forever so go out and get one if you don't already have one... or a couple)
INGREDIENTS
2 cups Trader Joe's Multigrain Baking & Pancake Mix (and a little more for sprinkling on work surface)
2/3 cup milk
3 tbsp oil
Now just follow the instructions on the side of the Trader Joe's Multigrain Baking & Pancake Mix box! (I've added my supplemental directions in parentheses)
Pre-heat oven to 425 degrees.
Stir together all the ingredients until moistened (I use a fork). Turn dough out onto a floured board (I use my counter) and knead 8-10 times. Roll or pat out 1/2 inch thick and cut with biscuit cutter dipped in flour (I like using the small biscuit cutter but any size works). Place on ungreased baking sheet (and melt a couple tbsp of butter in a mug in the microwave and brush it onto the unbaked biscuits before they go into the oven). Bake for 8-10 minutes or until golden brown. (I also brush with some more butter when they're hot out of the oven... it's the simple pleasures in life, right?)
And that's it! Then top with local honey or homemade fig jam (or slather with gravy like they do it down South). Mmmmm...
Thursday, February 3, 2011
Welcome the Year of the Rabbit
Happy New Year!
I have a feeling it's going to be a good year. Both my parents were born in the rabbit zodiac sign and according to Time magazine, "the transition from Tiger to Rabbit brings a change of vibe to the lunar year: The Year of the Rabbit is said to be a peaceful one, with those on either side of it (Tiger and Dragon) known for global unrest and change."
Hmmm... we should let Egypt and Tunisia know that...
Hope everyone has a happy, peaceful, and prosperous new year. Gong Hay Fat Choy!
I have a feeling it's going to be a good year. Both my parents were born in the rabbit zodiac sign and according to Time magazine, "the transition from Tiger to Rabbit brings a change of vibe to the lunar year: The Year of the Rabbit is said to be a peaceful one, with those on either side of it (Tiger and Dragon) known for global unrest and change."
Hmmm... we should let Egypt and Tunisia know that...
Hope everyone has a happy, peaceful, and prosperous new year. Gong Hay Fat Choy!
Tuesday, January 25, 2011
Butternut Squash Soup with Cranberries and Pumpkin Seeds
This is a great soup to warm you up after you come in from the winter weather! It's also a good meal to have after you get a couple wisdom teeth pulled (like Michael did today). This recipe is a little more savory than most butternut squash soups I've tried and a welcome addition to our meal rotation.
Recipe from SweetPaul:
INGREDIENTS
2 tablespoons olive oil
1 large yellow onion, peeled and sliced
2 cloves of garlic, sliced
2-pounds butternut squash, peeled, seeded and cubed
1 large potato, peeled and cubed
2 carrots, peeled and sliced
1 leek, only the white part, sliced
3 cups chicken stock
1/2 cup cream
Salt and pepper, to taste
4 tablespoons dried cranberries
3 tablespoons toasted pumpkin seeds, to serve
Heat oil in a large saucepan and fry onion and garlic until soft.
Add butternut squash, potato, carrots, leeks and stock.
Bring to a boil and let the soup simmer for 30 minutes.
Pour the soup into a blender and blend until smooth.
Pour into the pan and add cream.
Bring to a boil and simmer for 5 minutes.
Season with salt and pepper.
Serve soup with dried cranberries and toasted pumpkin seeds.
On a personal note, this recipe was a PERFECT way to use up the butternut squash, onions and potatoes we brought back from the Merschat's garden last weekend! AND the homemade chicken stock we made a couple months ago worked perfectly... and freed up some space in the freezer. I love this recipe!
Saturday, January 22, 2011
Christmas 2010
Happy New Year!!!
Thursday, January 20, 2011
Portobello Mushroom Burger
This post is dedicated to Martha and Roger for starting their vegan diet!
Michael and I like a less "juicy" mushroom burger so we usually put the mushrooms in a paper bag and put them in the fridge for up to a week before we cook them up. If you like your mushrooms juicier, then just cook it the day you pick it up from the store. This is definitely one of our favorite mid-week recipes.
Altered a tiny bit from the original recipe.
INGREDIENTS
4 portobello mushroom caps
1/4 cup balsamic vinegar (just enough to saturate underside of mushroom caps)
2 tablespoons olive oil (again just enough to saturate underside of mushroom caps)
Approx. 1 teaspoon dried Italian Seasoning*
Approx. 1 teaspoon dried oregano*
1 tablespoon minced garlic
salt and pepper to taste
4 slices cheese (or soy cheese!)
4 rolls of ciabatta or regular, ol' hamburger rolls
Sliced tomato, red onions and lettuce
Mayonnaise and mustard to taste
*Michael sprinkles more than 1 tsp. Italian seasoning and oregano on top of the mushroom caps... so keep sprinkling all you want!
Place the mushroom caps, smooth side down, on large dinner plate. Pour on the vinegar and oil, then sprinkle on the Italian Seasoning, oregano, garlic, salt, and pepper. Let stand at room temperature for at least 15 minutes or so.
Preheat grill for medium-high heat. (We just set our oven on 450 degrees and move one of the racks to the top of the oven).
Brush grate with oil. Place mushrooms on the grill, reserving marinade for basting. Grill for 5 to 8 minutes on each side, or until tender. Brush with marinade frequently. Top with cheese during the last 2 minutes of grilling. (Again, since we don't have a grill, we put a cookie sheet on the middle rack to catch the drippings and put the mushrooms (smooth side down) right on top of the top rack. Flip a few times until it's tender.)
Then assemble like you would a hamburger! Easy, healthy and delicious!
Michael and I like a less "juicy" mushroom burger so we usually put the mushrooms in a paper bag and put them in the fridge for up to a week before we cook them up. If you like your mushrooms juicier, then just cook it the day you pick it up from the store. This is definitely one of our favorite mid-week recipes.
Altered a tiny bit from the original recipe.
INGREDIENTS
4 portobello mushroom caps
1/4 cup balsamic vinegar (just enough to saturate underside of mushroom caps)
2 tablespoons olive oil (again just enough to saturate underside of mushroom caps)
Approx. 1 teaspoon dried Italian Seasoning*
Approx. 1 teaspoon dried oregano*
1 tablespoon minced garlic
salt and pepper to taste
4 slices cheese (or soy cheese!)
4 rolls of ciabatta or regular, ol' hamburger rolls
Sliced tomato, red onions and lettuce
Mayonnaise and mustard to taste
*Michael sprinkles more than 1 tsp. Italian seasoning and oregano on top of the mushroom caps... so keep sprinkling all you want!
Place the mushroom caps, smooth side down, on large dinner plate. Pour on the vinegar and oil, then sprinkle on the Italian Seasoning, oregano, garlic, salt, and pepper. Let stand at room temperature for at least 15 minutes or so.
Preheat grill for medium-high heat. (We just set our oven on 450 degrees and move one of the racks to the top of the oven).
Brush grate with oil. Place mushrooms on the grill, reserving marinade for basting. Grill for 5 to 8 minutes on each side, or until tender. Brush with marinade frequently. Top with cheese during the last 2 minutes of grilling. (Again, since we don't have a grill, we put a cookie sheet on the middle rack to catch the drippings and put the mushrooms (smooth side down) right on top of the top rack. Flip a few times until it's tender.)
Then assemble like you would a hamburger! Easy, healthy and delicious!
Thursday, January 13, 2011
Leonora
Michael and I stumbled upon this cheese at Whole Foods last week. Doesn't look too exotic and resembles one of our all time favorite cheeses, Humbolt Fog, so we thought we'd try it. Wow! We were so surprised how flavorful this Spanish goat cheese was! It was delicious and definitely one of our new favorites.
Here's some background into from Formaggio Kitchen if you're interested:
Country of Origin: Spain
Region: Castile and León
City / Village: León
Type of Milk: Goat
Cheese Style: Fresh-ripened
Flavor Profile: Medium-strong
From the dry, arid hills northwest of Madrid comes this large brick of soft, cakey goat’s milk cheese that will dazzle your palate with bright grass and lemon flavors. The crusty, natural rind makes a beautiful contrast with the pure white interior.
Yum!
Here's some background into from Formaggio Kitchen if you're interested:
Country of Origin: Spain
Region: Castile and León
City / Village: León
Type of Milk: Goat
Cheese Style: Fresh-ripened
Flavor Profile: Medium-strong
From the dry, arid hills northwest of Madrid comes this large brick of soft, cakey goat’s milk cheese that will dazzle your palate with bright grass and lemon flavors. The crusty, natural rind makes a beautiful contrast with the pure white interior.
Yum!
Tuesday, January 11, 2011
"Secret" Ingredient Chocolate Chip Cookie
Eleven days between blog posts... not starting off the year so well on the M&M Blog!
My excuse: Studying for the CPA. It not only takes up time, but also brain power (and motivation). So I'm sorry in advance if I'm a little slow posting in 2011!
But in any case... here's the recipe to my new "secret" ingredient chocolate chip cookie. The original name on The Pioneer Woman blog is Malted Milk Chocolate Chip Cookies. GREAT cookies... but I do love malted milk (daddy makes the best malts ever)... and they weren't malty enough for me. So now I refer to the malt in my new stand-by chocolate chip cookie recipe as the "secret ingredient" because you can barely taste it but it still makes for an addictive chocolate chip cookie.
Step-by-step instructions with beautiful pictures and entertaining commentary on The Pioneer Woman blog.
Boring recipe with a slight change (dark chocolate chips instead of milk chocolate chips) is below. Yum!
INGREDIENTS
1 cup (2 Sticks) Unsalted Butter Softened
¾ cups Golden Brown Sugar
¾ cups Sugar
2 whole Eggs
2 teaspoons Vanilla Extract
2 cups All-purpose Flour
1-¼ teaspoon Baking Soda
1-¼ teaspoon Salt
½ cups (rounded) Malted Milk Powder
1 bag (12 Ounce) Ghirardelli 60% Cacao Bittersweet Chocolate Chips
DIRECTIONS
Preheat oven to 375 degrees.
Cream butter, then add both sugars and cream until fluffy. Add eggs and beat slightly, then add vanilla and beat until combined. Add malted milk powder and beat until combined.
Sift together flour, baking soda, and salt. Add to butter mixture, beating gently until just combined.
Add chocolate chips and stir in gently.
Drop by teaspoonfuls (I LOVE my cookie scoop!!!) and bake for 10 to 12 minutes. Bake less if you want chewy cookies; more if you want crispy cookies.
My little note: My cookies never come out as thin and crispy as The Pioneer Woman's. Still delicious, but they just look like normal chocolate cookies and not like the photos on her blog. That's all!
My excuse: Studying for the CPA. It not only takes up time, but also brain power (and motivation). So I'm sorry in advance if I'm a little slow posting in 2011!
But in any case... here's the recipe to my new "secret" ingredient chocolate chip cookie. The original name on The Pioneer Woman blog is Malted Milk Chocolate Chip Cookies. GREAT cookies... but I do love malted milk (daddy makes the best malts ever)... and they weren't malty enough for me. So now I refer to the malt in my new stand-by chocolate chip cookie recipe as the "secret ingredient" because you can barely taste it but it still makes for an addictive chocolate chip cookie.
Step-by-step instructions with beautiful pictures and entertaining commentary on The Pioneer Woman blog.
Boring recipe with a slight change (dark chocolate chips instead of milk chocolate chips) is below. Yum!
INGREDIENTS
1 cup (2 Sticks) Unsalted Butter Softened
¾ cups Golden Brown Sugar
¾ cups Sugar
2 whole Eggs
2 teaspoons Vanilla Extract
2 cups All-purpose Flour
1-¼ teaspoon Baking Soda
1-¼ teaspoon Salt
½ cups (rounded) Malted Milk Powder
1 bag (12 Ounce) Ghirardelli 60% Cacao Bittersweet Chocolate Chips
DIRECTIONS
Preheat oven to 375 degrees.
Cream butter, then add both sugars and cream until fluffy. Add eggs and beat slightly, then add vanilla and beat until combined. Add malted milk powder and beat until combined.
Sift together flour, baking soda, and salt. Add to butter mixture, beating gently until just combined.
Add chocolate chips and stir in gently.
Drop by teaspoonfuls (I LOVE my cookie scoop!!!) and bake for 10 to 12 minutes. Bake less if you want chewy cookies; more if you want crispy cookies.
My little note: My cookies never come out as thin and crispy as The Pioneer Woman's. Still delicious, but they just look like normal chocolate cookies and not like the photos on her blog. That's all!
Saturday, January 1, 2011
Happy New Year!
Any year that starts with 1-1-11 must be a special year, right?
We just got back from my step cousin's house (I think that's what he's called) down in Richmond, Va., to see my Aunt Mary Alice, Uncle Sam, cousin Karen, cousin Kevin, second cousin Kelly, and step cousin Bill and his family. Dinner was fantastic and it was so great to catch up with family to kick off the new year. I love the holidays.
Yesterday, we ended 2010 by going to see the Spielberg and Lucas private collections of Norman Rockwell paintings at the Smithsonian American Art Museum. Our favorite was The Connoisseur.
It was a really neat exhibit and we're so glad we caught it just before it closed.
Hope you have a happy and healthy new year!
Thursday, December 30, 2010
California Christmas
This was Michael's first Christmas away from home and we had a great California Christmas! We were home a whopping 10 days but it went by super fast.
The reason we went home a week before Christmas was to go wedding dress shopping with Ming-Cee! She found her dress at Novella Bridal after MUCH deliberation between two equally fantastic dresses. It was tough decision but I know she made the right choice and will be beautiful walking down the aisle!
And of course we also found some new favorite restaurants!
B-Star - Delicious! One of our new favorites in SF. Next time we'll have to make reservations at its sister restaurant down the street, Burma Superstar.
Roxy - We haven't spent much time in Sacramento, but since Ming-Cee and Pat live there now... this is our new favorite place to eat.
Belden Place - Always a great place to check out when you can't decide what you want to eat... we ate at Cafe Bastille. Lots of fun.
Chow - The Lafayette restaurant of choice. Ahhh... Lamorinda... it's nice to be home.
The reason we went home a week before Christmas was to go wedding dress shopping with Ming-Cee! She found her dress at Novella Bridal after MUCH deliberation between two equally fantastic dresses. It was tough decision but I know she made the right choice and will be beautiful walking down the aisle!
I also threw a little bridal brunch for her and the ladies. That was so much fun and I'm really looking forward to working with this great group of beautiful women.
And of course we also found some new favorite restaurants!
B-Star - Delicious! One of our new favorites in SF. Next time we'll have to make reservations at its sister restaurant down the street, Burma Superstar.
Roxy - We haven't spent much time in Sacramento, but since Ming-Cee and Pat live there now... this is our new favorite place to eat.
Belden Place - Always a great place to check out when you can't decide what you want to eat... we ate at Cafe Bastille. Lots of fun.
Chow - The Lafayette restaurant of choice. Ahhh... Lamorinda... it's nice to be home.
Subscribe to:
Posts (Atom)