Wednesday, June 1, 2011

Spring Garden... FINALLY!

This year, our herb table includes chives, rosemary, sage, lavender, tarragon, savory, nasturtium, thyme, oregano, and mint.

For the bigger plants, we decided to make the recycled-material self-irrigating planter (SIP) since it worked so well last year!
And Michael helped me finish up our balcony garden while I was out of town this past weekend... isn't he thoughtful!?!
Strawberries, flat-leaf parsley, dill, and oregano.
Raspberries.
Yellow pear tomatoes, cherry tomatoes, and two types of basil.
Early girl tomatoes and more basil.
Chinese eggplant, hot peppers, and thyme.
And out bay leaf survived the winter and has started to sprout again!  Yay!

I love spring!

Lake Tahoe

Sorry for the lack of posts in the last couple weeks!  I just got back from a beautiful weekend in Lake Tahoe for Ming-Cee's bachelorette party.  The theme was Sunshine & Shananigans... but Mother Nature turned it into Snowflakes & Shananigans.
Needless to say, we didn't unpack our bikinis but the beautiful ladies were troopers and we had a fantastic time.  It's hard not to have fun in GORGEOUS Lake Tahoe snow or shine...

Wednesday, May 18, 2011

Flank Steak with Gorgonzola-Roasted Mushrooms and Onions


I'm not a big steak eater... but this is a nice treat when you're craving red meat.  Michael tops the steak with an easy Gorgonzola-Roasted Mushrooms and Onion topping and it makes it look and taste so gourmet!

We served it with a side of zuchini and quinoa.  This whole meal goes along with our favorite theme: quick, easy, and delicious.


INGREDIENTS
3/4 pound shiitake mushrooms, stems discarded and caps sliced 1/2 inch thick
2 red onions, cut into 1/2-inch wedges
5 tablespoons extra-virgin olive oil
Kosher salt and freshly ground pepper
1/2 teaspoon thyme leaves
3 ounces Gorgonzola Dolce, cut into 1/2-inch pieces

Preheat the oven to 425°. On a large rimmed baking sheet, toss the mushrooms and onions with the oil and season with salt and pepper. Roast for about 30 minutes, until tender, tossing once.  (You can do the steak while this is roasting)

Sprinkle the vegetables with the thyme and toss. Sprinkle with the Gorgonzola and roast for about 5 minutes, until the cheese is melted. Transfer to plates and serve.


Grilled Balsamic and Garlic Flank Steak
INGREDIENTS
2 tablespoons balsamic vinegar
2 tablespoons extra-virgin olive oil
1 large garlic clove
1/2 teaspoon thyme leaves
One 2 1/2-pound flank steak
Salt and freshly ground pepper

In a blender, combine the vinegar, oil, garlic and thyme and puree until smooth. In a large glass or ceramic dish, pour the marinade over the steak. Let stand for 5 minutes.

Heat a grill pan (or pizza stone like we do). Season the steak with salt and pepper. Grill over moderately high heat, turning once, until medium, about 8 minutes per side. Transfer the steak to a board and let stand for 10 minutes. Slice the steak, transfer to plates and serve.

Sunday, May 15, 2011

Grilled Salmon with Orzo Salad


The flavors in this dish work perfectly together. The warm salmon on top of the cold orzo salad make for the perfect summer dish! I think this will be a fast and easy mid-week dinner for us in the coming months.

(from Food & Wine)
INGREDIENTS
1 cucumber, peeled, halved, seeded, and cut into 1/2-inch dice
4 plum tomatoes, cut into 1/2-inch dice
1 teaspoon salt
1/2 pound orzo (about 1 cup)
1/3 cup plus 1 tablespoon olive oil
2 tablespoons plus 1 teaspoon lemon juice
1/3 cup plus 1 tablespoon chopped fresh dill
Fresh-ground black pepper
1 1/2 pounds salmon fillet, about 1 inch thick, cut into 4 pieces
Grated zest of 1/2 lemon

In a strainer set over a medium bowl, toss the cucumber, tomatoes, and 1/2 teaspoon of the salt and let drain for 15 minutes.

Meanwhile, in a large pot of boiling, salted water, cook the orzo until just done, about 12 minutes. Drain. Rinse with cold water and drain thoroughly. Toss the orzo with the 1/3 cup oil, the lemon juice, the 1/3 cup dill, 1/4 teaspoon of the salt, and 1/8 teaspoon pepper.

Light the grill. Coat the salmon with the 1 tablespoon oil, the remaining 1/4 teaspoon salt, and 1/4 teaspoon pepper. Grill the salmon, skin-side up, for 4 minutes. Turn and sprinkle with the 1 tablespoon dill and the lemon zest. Cook the fish until golden brown and just barely done (the fish should still be translucent in the center), about 3 minutes longer.

(If you don't have a grill (like us) pre-heat the oven at 425F.  While it's pre-heating, sear the salmon skin-side down for a few minutes in an oven-proof skillet.  Then turn your broiler on "HI" and put the skillet on the upper rack for about 4 minutes.  Center will be on the rare side.)

Serve the fish on the salad.

Monday, May 9, 2011

Perfect Chocolate Chip Cookie? Perhaps.

I was reading something on Apartment Therapy or The Kitchn and I somehow stumbled upon this recipe.

It was originally published in the NYTimes by the title "Quest for the Perfect Chocolate Cookie."  Well... does that sound like an invitation or what? 

The kicker is the prep time... 2 days.  Yup.  The dough needs to rest for 24 to 36 hours.  I mean really... does it make that much difference?  IT DOES!!!

In the name of science, Michael and I tested a couple cookies after only resting for a couple hours.  Pretty good cookie but nothing special.  But two days later... the flavor really had a sense of depth and the little bit of sea salt brought out all the subtle tones.  We were all pleasantly surprised at the transformation and invite you to try these damn good cookies... if you have the patience to wait for them!

Chocolate Chip Cookie
INGREDIENTS
2 cups minus 2 tablespoons (8 1/2 ounces) cake flour
1 2/3 cups (8 1/2 ounces) bread flour
1 1/4 teaspoons baking soda
1 1/2 teaspoons baking powder
1 1/2 teaspoons coarse salt
2 1/2 sticks (1 1/4 cups) unsalted butter
1 1/4 cups (10 ounces) light brown sugar
1 cup plus 2 tablespoons (8 ounces) granulated sugar
2 large eggs
2 teaspoons natural vanilla extract
1 1/4 pounds bittersweet chocolate disks or fèves, at least 60 percent cacao content (see note) - I used ghirardelli cacao bittersweet chocolate chips
Sea salt

1. Sift flours, baking soda, baking powder and salt into a bowl. Set aside.

2. Using a mixer fitted with paddle attachment, cream butter and sugars together until very light, about 5 minutes. Add eggs, one at a time, mixing well after each addition. Stir in the vanilla. Reduce speed to low, add dry ingredients and mix until just combined, 5 to 10 seconds. Drop chocolate pieces in and incorporate them without breaking them. Press plastic wrap against dough and refrigerate for 24 to 36 hours. Dough may be used in batches, and can be refrigerated for up to 72 hours.

3. When ready to bake, preheat oven to 350 degrees. Line a baking sheet with parchment paper or a nonstick baking mat. Set aside.

4. Scoop 6 3 1/2-ounce mounds of dough (the size of generous golf balls) onto baking sheet, making sure to turn horizontally any chocolate pieces that are poking up; it will make for a more attractive cookie. Sprinkle lightly with sea salt and bake until golden brown but still soft, 18 to 20 minutes. Transfer sheet to a wire rack for 10 minutes, then slip cookies onto another rack to cool a bit more. Repeat with remaining dough, or reserve dough, refrigerated, for baking remaining batches the next day. Eat warm, with a big napkin.

Yield: 1 1/2 dozen 5-inch cookies.

Note: Disks are sold at Jacques Torres Chocolate; Valrhona fèves, oval-shaped chocolate pieces, are at Whole Foods.

Sunday, May 8, 2011

Highlights from Chicago

Aside from Garvey and Sonja's beautiful wedding, the ultimate highlight from our Chicago trip was going to the taping of Wait, Wait Don't Tell Me!  Extremely entertaining two hours... highly recommended if you're a fan of the show.

I guess since I was the day-of coordinator and Michael was a groomsman, we somehow ended up with no photos from the wedding.  And so here are some highlights from Millennium Park with Roger and Sweeper...


Classy...

Thursday, May 5, 2011

Easy, Healthy, Delicious Sauteed Kale

The last month or so, I've been seeing these big bags of dark, leafy greens in the supermarket.  Didn't pay much attention to them... but I will from now on!

Kale is a highly nutritious vegetable with powerful antioxidant properties and is very high in beta carotene, vitamin K, vitamin C, lutein, zeaxanthin, and reasonably rich in calcium (thanks wikipedia!)

So, like I said, I didn't pay much attention to them at Safeway until Dad and Mom Merschat brought us two bags of kale from their garden.  Well how the heck do you cook this stuff?

We tried this Sauteed Kale recipe last night because it was super easy and we had all the ingredients already.  Thanks Bobby Flay... YUM!

INGREDIENTS
1 1/2 pounds young kale, stems and leaves coarsely chopped
3 tablespoons olive oil
2 cloves garlic, finely sliced
1/2 cup vegetable stock or water
Salt and pepper
2 tablespoons red wine vinegar

Heat olive oil in a large saucepan over medium-high heat. Add the garlic and cook until soft, but not colored. Raise heat to high, add the stock and kale and toss to combine. Cover and cook for 5 minutes. Remove cover and continue to cook, stirring until all the liquid has evaporated. Season with salt and pepper to taste and add vinegar.

Wednesday, April 27, 2011

Easter Brunch 2011


Last Sunday, we hosted our largest annual Easter Brunch ever!  Unforunately, I was too busy and totally forgot about taking pictures so all of these are post-brunch photos.

Brunch was especially fun this year because three of my old friends from my hometown joined us to celebrate!  There are about a dozen Campolindo High School alumni living in DC from my graduating class and it's so great to have a little taste of home when you're 3,000 miles away.

But I must say that it was a wonderful success and we even got to use the beautiful three-tiered serving dish that Bill and Pat got us for Christmas (but Mom and Dad Merschat brought it up for the weekend and we opened it up on Easter Eve... what perfect timing!)

We stuck with some tried and true recipes for our brunch menu:
Chocolate Cupcakes (featured above with robin eggs on top)
Strawberry and Rosemary Scones (PERFECT for spring brunch)
Red Pepper Hummus (Michael also made an extra batch sans pepper for Mama Merschat)
Chicken Salad Sandwiches (featured on our beautiful new serving platter)
Lox and Bagels
Mini Quiches
Fruit Salad
Mimosas (of course!)

And the highlight of the afternoon was the Merschat family tradition of Easter Egg "dutzing."  I can't find any reference of "dutzing" (or any other variation on its spelling) via google but I did find this link explaining German Easter Egg Battles.

So you take some beautifully decorated Easter eggs that took hours to decorate and dye...

...and then you pick a partner and smack the eggs together!  One egg will crack, the other will not, and the winner "challenges" another opponent with a non-cracked egg until there is only one winner.  The winner gets good luck all year long... and this year Mama Merschat got all the good luck with her winning mushroom egg.

Tuesday, April 26, 2011

Easy Garlic-Crusted Roast Rack of Lamb

We had a wonderful Easter weekend with Dad and Mom Merschat in DC!  In addition to church at the National Cathedral and Easter brunch, we had dinner at Elizabeth's on Saturday and Michael made the most delicious rack of lamb.  (Forgot my camera so we didn't get any photos but it looked pretty similar to the magazine photo above... without the twigs under the plate!)

Of course it's from the most recent Food & Wine and a relatively simple recipe.  We served it with a salad and the Wild Rice and Brown Rice Salad with Walnuts and Asparagus.  So good.

INGREDIENTS
1 head of garlic, cloves peeled
1/4 cup rosemary leaves
1/4 cup extra-virgin olive oil
2 racks of lamb, frenched (2 pounds each)
Salt and freshly ground pepper

In a mini food processor, combine the garlic, rosemary and olive oil and process until the garlic is finely chopped. Season the lamb racks with salt and pepper and rub the garlic-rosemary oil all over them. Set the racks fat side up on a large rimmed baking sheet and let stand for 1 hour.

Preheat the oven to 450°. Roast the lamb in the upper third of the oven for 15 minutes. Turn the racks and roast for 10 minutes longer for medium-rare meat. Transfer the racks to a carving board, stand them upright and let rest for 10 minutes.

Carve the racks in between the rib bones and transfer to plates. Serve right away.

Friday, April 22, 2011

Happy Friday!

It's just been one of those days that has dragged on forever...

...so I thought I'd post one of our favorite videos because it always puts a smile on my face (especially on days like this).
Happy Friday!

Tuesday, April 19, 2011

Growing Mushrooms

...well, not quite the Alice in Wonderland mushrooms that will make you grow taller and shorter... but equally as awesome!

Carl and Holley are growing shiitake mushrooms!  They inoculated the logs last weekend and I couldn't contain myself so I had to post photos:


Shiitake mushrooms have some great health benefits so we're definitely going to look for some delicious recipes when these little babies are harvested!

And last but not least, Ernie helped too...

Tuesday, April 12, 2011

Easy Jam Tart


The crust is what makes this super simple tart.  It reminds me of buttery cornbread.

Spring is the perfect time for sweet and easy treats!  I found this recipe on Smitten Kitchen, and she got it from David Lebovitz... and since I love both blogs so much, I figured this recipe had to be a winner.

Now, I'd love to try this recipe with apricot jam but I didn't have any in my pantry.  However, I did have two delicious looking jams in my kitchen so we did a bake-off: Cherry vs. Orange Cranberry Marmalade.


VS.


And the winner is.....

CHERRY!  (The marmalade is truly delicious but the cherry tastes better in this tart)


INGREDIENTS
1/2 cups (210 grams) all-purpose flour
1/2 cup (70 grams) stone-ground cornmeal or polenta
2 teaspoons baking powder
1/2 teaspoon salt
9 tablespoons (4 1/2 ounces or 130 grams) unsalted butter, at room temperature
1/2 cup (100 grams) granulated sugar
1 large egg, whole
1 large egg, separated
1/8 teaspoon almond extract
1 1/3 to 1 3/4 cups (450 grams) jam (see Note above; I used the smaller amount) or marmalade
2 tablespoons (30 grams) coarse-crystal or granulated sugar

In a small bowl, whisk together the flour, cornmeal, baking powder and salt. In a stand mixer with the paddle attachment or in a food processor, mix the butter and 1/2 cup (100 grams) sugar together until smooth. Add the egg, egg yolk (keep the egg white from the second egg on hand for later) and almond extract and beat until combined. Gradually add the flour mixture and mix until the dough just comes together.

Transfer about one-third of the dough to a lightly floured counter and shape it into a log about 2 inches (5 cm) in diameter. Wrap it in plastic wrap and refrigerate it until needed. (As always, I was in a rush and put this in the freezer.)

Transfer the remaining dough to a buttered 9-inch (23-cm) tart pan with a removable bottom of a 9-inch (23-cm) springform pan. Using your hands, press the dough evenly into the bottom. If using a tart pan, press the dough up the sides to the rim of the pan and set the tart pan on a baking sheet. If using a springform pan, press the dough about 3/4-inch (2-cm) up the sides of the pan. Refrigerate the dough-lined pan until firm, at least one hour. (Again, I used the freezer and it was firm in 30 minutes. I am impatient.)

Preheat the oven to 375°F (190°C). Spread the jam or marmalade evenly over the dough in the pan. Cut the chilled dough into very thin discs with a sharp paring knife. Arrange them slightly overlapped in concentric circles over the jam to form a top crust. Whisk the remaining egg white with a teaspoon of water until frothy; brush evenly over the tart lid and then sprinkle with 2 tablespoons (30 grams) coarse sugar. Bake until the top crust is golden brown, about 25 minutes. Let cool completely.

Do ahead: This tart keeps beautifully for up to 3 days if well-wrapped at room temperature. David says that it’s pretty sturdy, so perfect to take along on a picnic.

Tuesday, April 5, 2011

Garden Party & Bonfire 2011

Let us know if you want to join us in Barnardsville for Independence Day weekend!  We'd love to see you!

Sunday, April 3, 2011

Easy Monkey Bread Muffins


I've always had a little sweet spot of monkey bread but it's always seemed so messy when baked in a loaf or in a bundt pan.  So when I saw this recipe on Two Peas and their Pod, I had to try it out.  Here's my version of the recipe with a couple tweaks:

INGREDIENTS
3 cans of refrigerated biscuits (I used the Safeway Jumbo biscuits)
2 tsp. ground cinnamon
3/4 cup of sugar
1/2 cup chopped pecans (optional)
1 stick of butter
1 cup of brown sugar

1. Preheat the oven to 350 degrees. Spray a muffin tin with cooking spray.
2. Cut the biscuits in quarters and roll the dough into little balls.
3. Combine the cinnamon, sugar and optional chopped pecans. Roll the balls in the mixture.
4. Place four balls in one muffin cup. Fill the pan.
5. Melt the butter and brown sugar in a small pot on the stove. Stir until melted and bubbly.
6. Pour the gooey sauce over the muffins.
7. Bake for 10-15 minutes (depending on oven... mine took about 15 mins)
8. Cool for a minute in pan. Remove muffins from pan and enjoy the pretty little muffin!
Makes 24 muffins


Forget about your diet momentarily... you're going to want to make this for breakfast next weekend...

Wednesday, March 30, 2011

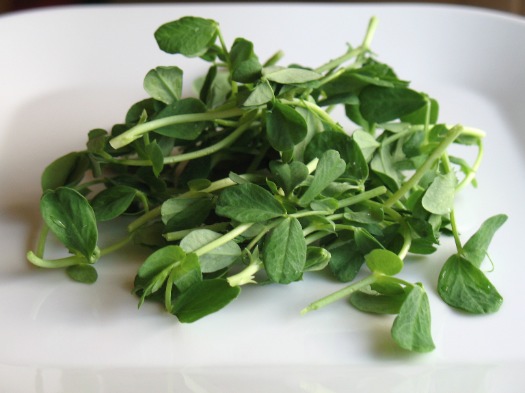
Pea Shoots

Here's a little surprise we got in our Washington's Green Grocers box last week: Pea Shoots!

They sort of look like sprouts so we put them on our favorite portabello mushroom burger in lieu of lettuce and it was great!  It's probably closer to a spinach substitute than a lettuce/spouts substitute because of its stronger flavor and texture, but what a great little green!  I think it will be great mixed into salads, tossed in pasta, and substituted in for lettuce/sprouts (like in our yummy chicken salad sandwich!)

So if you see these little babies at the farmer's market or supermarket, it's definitely worth a try.

Tuesday, March 29, 2011

Pride and Prejudice

I'm not sure how I got through high school and college without reading Pride and Prejudice... but somehow it slipped through the literary cracks.  Fortunately, this was the perfect book to take my mind off studying before bed and the short chapters were easy for me to pick up and put down.

But even if you're not studying, Pride and Prejudice is still one of those must-read books.

I have yet to meet a woman who has not fallen in love with the 2005 movie starting Keira Knightly and my love for the movie definitely encouraged me to read the book.


It's a quick read but you have to get used to the old-fashioned writing style of the time and the English spellings.  But that's easy to get past and you are guaranteed to be whisked away into the romantic lives of the Bennett sisters.  I think anyone with a sister can relate to the characters at least a little bit.  They family dynamics and personalities are witty, sarcastic, entertaining, and timeless.

I also love comparing books to the movies... and there are definitely some significant differences.  This is a fun summer read with the intrinsic value of reading a classic masterpiece.  I'm giving it an 8 out of 10.

Sunday, March 20, 2011

Our New Car!

We knew this day would come.  It was time to retire Michael's beloved 1995 Nissan Maxima SE with 192,000+ miles.  Yes, it was time.

We went into this car shopping business with our hearts set on a Subaru but after test driving the Subaru Outback, Subaru Forrester, Mitsubishi Outlander and Hyundai Santa Fe... the Santa Fe was the clear winner.


Look at all that room!  This is Michael and my first non-sedan car and I still need to get used to driving the taller and wider car.


Now we did need to purchase the "Limited" model to get the sunroof so we ended up spending more than if we were to get a Subaru Forrester, but look at all the fancy gadgets we got!  We love it.  And of course, the sunroof...


Having car payments is not going to be fun but I definitely think it's worth it.  Michael got everything he could out of his Maxima (we called it the "Ma_i_a" because the letters were falling off the back of the car) and even traded it in for a whoppin' $500!


Goodbye ol' gal.  It was a good, long ride and we'll miss you...

Tuesday, March 15, 2011

Re-Post: Easiest Banana Bread Ever

This is a re-post of the easiest and best banana bread recipe from our old super-slow blog.  My competitive dancer, piano recital performing, active sorority member, always volunteering cousin SOMEHOW finds time to also keep her grades up at UC San Diego AND bake for her friends during finals.  I don't know how these kids do it these days!

So this recipe re-post is dedicated to my super woman cousin :) 

INGREDIENTS (you probably have most in your kitchen already)
3 or 4 ripe bananas, smashed
1/3 cup melted butter
1 cup sugar (can easily reduce to 3/4 cup)
1 egg, beaten
1 teaspoon vanilla
1 teaspoon baking soda
Pinch of salt
1 1/2 cups of all-purpose flour (I like using our favorite Trader Joe’s Multigrain Baking & Pancake Mix)
2/3 cup dark chocolate chips (or more if you’re a chocoholic like Michael)
1/3 cup toasted, sliced almonds OR walnut pieces (optional)

DIRECTIONS (No Mixer Required!!)
1. Preheat the oven to 350°F (175°C) and put on your apron
2. With a fork, mash up the bananas in a big mixing bowl
3. Then melt butter in a cup in the microwave and mix into the mashed bananas
4. Now mix in the sugar, egg, and vanilla
5. Sprinkle the baking soda and salt over the mixture and mix in
6. Add the flour last and mix just until it’s all blended
7. Fold in chocolate chips, almonds, or walnuts
8. Pour mixture into a buttered 4x8 inch loaf pan and bake for 1 hour (or you could line muffin cups and poor mixture into 18 cups)
9. Bake until toothpick comes out clean (about 1 hour for loaf pan or 30 mins. for muffins)
10. Cool on rack for a while so it’s easier to flip out of the pan
11. Flip the bread out of the pan, slice, eat some while it’s still warm, bring some into work to share (or not), and never waste over-ripe bananas again!

Sunday, March 13, 2011

Moist Chocolate Cupcakes with Vanilla Buttercream


Out of the blue last week, I had a craving to find a great chocolate cupcake recipe... dense, moist, easy and delicious... and I think I found it.  (And The Farm Chick's blog that I found it on will definitely make it on my RSS feed - it's cute!)

The only thing I may change is the frosting.  The buttercream frosting was a little too sweet for me and Michael and I will probably make our favorite whipped cream cheese frosting instead next time.  The actual cupcake recipe though... mmmm... perfect.

Moist Chocolate Cupcakes with Vanilla Buttercream

CUPCAKE INGREDIENTS
1 cup sugar
1 cup brown sugar (not packed)
1 3/4 cup flour
3/4 cup cocoa powder
1 1/2 tsp baking soda
1 1/2 tsp baking powder
1/2 tsp salt
2 eggs
1 cup milk
1/2 cup vegetable oil
2 tsp vanilla
1 cup boiling water

Preheat oven to 350 degrees. Fill muffin pans with 24 cupcake liners.

Sift dry ingredients into a mixing bowl. (If you're using a hand mixer, I recommend a batter bowl to easily pour the batter into the cupcake liners). Add eggs, milk, oil and vanilla. Beat with a mixer for about two minutes, occasionally scraping the sides of the bowl with a rubber spatula. Add the boiling water, and beat, just until blended. (Don't be alarmed - the batter appears watery). Evenly ladle (or pour) the batter into the liners.

Bake for 20-25 minutes, until the center of the cupcakes springs back when lightly touched. Cool and frost.


VANILLA BUTTERCREAM INGREDIENTS
1/3 cup butter, just slightly cooler than room temperature
3 1/2 cups powdered sugar
1/4 cup milk
1 1/2 tsp vanilla

Beat butter in a medium-sized mixing bowl until creamy. Gradually beat in 3 cups of the powdered sugar. Beat in milk and vanilla. Blend in remaining 1/2 cup powdered sugar.